Handmade cards & scrapbooking...

Wednesday, January 30, 2013

Inky Impressions Challenge


Hello, Inky Impressions has a new challenge

using a
Bingo Board


Inky Impressions is also showing some new release stamps as well.

I have made a Shadow box using the new release stamp 'Lili crossing legs' & I also used the new release digi 'Chair'.


Inky Impressions has also release some new digi sentiments, I have used the Happy Valentine's Day sign.


Gorgeous isn't she.......
I have used foam dots on the chair as well as on Lili, so they sit out a bit.
I have stuck some red heart pearls on the back of the chair.


I have coloured the sentiment sign in with red copic's.


I have used the top line on the bingo board.


Don't forget to pop over to Inky Impressions now & check out the challenge & what the rest of the team have created HERE


I will be entering into the following challenges:


I hope you have enjoyed your visit


All the best
Kerry


Sunday, January 27, 2013

Shabby chic pin cushion


Hello, I have made a shabby chic style pin cushion
I would have to say shabby chic would have to be my favourite style, love the romantic pretty look.


I made this pin cushion using a small recycled plastic container, fill it with hobby fill & covered it with cream fabric.


I made a bow with some pink silk ribbon (The ribbon girl), cream shabby seam binding (from live & love crafts) & some pearl string in 2 colours.
I tried them all together than added a pearl brad to the centre.


Around the top & bottom I have used a cream lace & some chocolate tulle pleat trim. 
Around the top edge of the lace I added a strip of pink & cream pearl strings.


I also made small bows to match the big one at the front, but used a flower (flowers from wild orchid) instead of a pearl brad for the centre. I have added some pearl string from each bow along the top.
I have also added some heart stick pin to the bows along the bottom.


To finish this cushion I added some small rhinestones ( rhinestones from Inky Impressions) around the centre & top on the fabric.

Very happy with the way this pin cushion looks, will be making more for sure. They would made great gifts.


All the best
Kerry


I will be entering my pin cushion into the following challenges:

Wednesday, January 23, 2013

Inky Impressions Challenge

Hello, this weeks new challenge at Inky Impressions is

'Celebration'


I made a card using Sassy Lili from Inky Impressions.


I have added a sunglasses charm from Inky Impressions.
I added some small pearls which also come from Inky Impressions.


I have ink around the edge of the image.


I also dress the inside of the card.


Don't forget to pop over to Inky Impressions & check out the new challenge & what the rest of the team have created HERE


This card will be entered into the following challenges:


All the best
Kerry


Saturday, January 19, 2013

Monster Stringing Hearts

Hello, I have made a card using the new digi 'Monster Stringing  Hearts' from Inky Impressions.


So love this cute monster. 
I have made a card with lots of layers & a tag.
I have used a new digi sentiment from Inky Impressions.


I have coloured him brown with copic marker's.
I made a string of hearts using some small hearts I cut with a die & a piece of twine.


I made a tag for the corner so you have a spot to write a special message.


On the bow I added a brad & heart charm which I got from Inky Impressions.


Pop over to Inky Impression store now & check out the other new release Digis, sentiments & stamps HERE


This card will be entered into the following challenges:


All the Best 
Kerry


Wednesday, January 16, 2013

Blog Hop Day 2

Hello, welcome to day 2 of Inky Impressions 'Love Spell' Blog Hop.


Prize: 

One winner will receive 2 free digis (as previously announced)
Then since we are having an extra day of the hop we will also give away 2 more digis but to TWO different people.....so there will be 3 winners in total


I have something extra special to show you today.
I have made a Exploding box with mini easel card using the new digi 'Sent with Love Girl'.


On top of the box I have made a mini easel card.
I have made some small heart tags on the side.


I have added some metal corners & 2 big red bows with pearls in the centre (pearls are from Inky Impressions).


I have also included a new release digi sentiment.


Under the lid I have included a heart for a special message.


Inside the box I have added lots of hearts on plastic strips to give a floating effect.
Each heart with ribbon is a tag.


I have made tags for special messages as well.


What it looks like when tags are out. I have plastic strips for the tags to sit under & on top of each strip is a letter which ends up spelling 'LOVE'. I coloured each letter with a red copic marker then added some red stickles on top.


One of the tags sitting under the plastic strip.


Underneath the top layer I have added more hearts, so you have more room for special messages.


The centre of the box has a heart standing up in a garden of flowers. I added a red bow & a couple of pretty pins. The centre also doubles as something extra special see below.


I have also made it to hold a ring so you could use it for a beautiful ring box as well.


The white card stock was cut to size then embossed with hearts.
This has been a lot of work over a couple of days but totally worth it.
I love making exploding boxes.


Blog Hop Order:

Audrey
Bettina
Carrie
Karen
Kerry(you are HERE)
Lyndsey
Ria
Tanya J
Tonya H
Vicky


I hope you have enjoyed your visit.


All the best

Inky Impressions Challenge

Hello, time for new a new challenge over at Inky Impressions. The challenge this week is

'Tag it'


I have made a recipe card & tags set using 'Lili's icecream' from Inky Impressions.


This recipe is for Black Cherry Jam...yum. I have made a pocket for the card & tags to sit in.


I have coloured Lili using copic marker's. The small pearls around Lili are from Inky Impressions.


I have used paper from Kaisercraft.


I have made some tags with the idea being that you can try them around the jar of jam when finished.
I have also stamp a place on the back of each tag so you can write the date.


This is what the pocket looks like when nothing is in it.
I have added a small charm to the front tag, which I got from Inky Impressions.


Don't forget to pop over to Inky Impressions & check out the new challenge & what the rest of the team have created HERE.


This recipe card set will be entered into the following challenge:


All the best 
Kerry

Tuesday, January 15, 2013

Blog hop


Hello, welcome to Inky Impressions 2 days 'Love Spell' blog hop. Today we have some new release digis to show you.


* The winner of the blog hop will receive 2 free digis of their choice. They have until January 22 to comment and the winner will be annouced on the challenge blog January 23


I have made a shadow box using the new digi 'Cat love on hill'.


I have made this shadow box out of card stock.
I made a small box, cut a frame using a punch.


I have added some metal corners to the picture & also used some stickles on the moon & stars.
I have cut a lamppost out & added it to the inside of the box. I also added some flower inside the box.


I have cut some hearts out & on each one added the letters to make Love. I put the letter on using foam dots.
I added lots of flowers around the frame & used some stickles on them.


I have also added some pretty pins on the left bottom corner. I have used a beautiful little heart lock & key charm from Inky Impressions. 


Blog Hop Order

Kerry (you are HERE)
Lydia (NEXT)
Ria


Thank you for visiting & I hope you liked my Shadow Box.


All the best

Saturday, January 12, 2013

2013 Calendar

Hello, I have made a 2013 Calendar using Princess Lili from Inky Impressions.
I have my calendar with a vintage theme.


For this calendar I have added lots of layers & details. 
I have used a heart edge punch for the trim around the calendar. 


I have used copic marker's to colour Lili in. 
I have used some stickles to glitter Lili's dress, wand, crown & flowers.


I have used some old chipboard numbers, which I coloured brown using my copic marker's & I then added some platinum stickles over the top. I have use dies to cut some swirls & butterflies.


I have added pearls & a charm  from Inky Impressions.


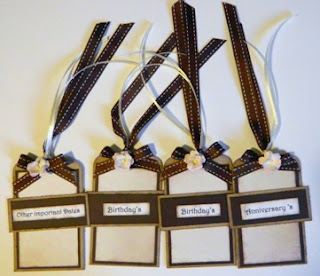
For this calendar I have added tags so you can record special dates you need to remember.


Front & back of the tags.


I have used kraft card stock, dark brown card stock, pattern paper & then inked all the edges using a brown ink.


Don't forget to stop by the Inky Impressions Store & check the beautiful range of images they have 


All the best
Kerry

Wednesday, January 9, 2013

Inky Impression Challenge

Hello, it's that time of the week again for a new challenge over at Inky Impressions.
This week the challenge is 'Sentiments'.


I have made a card using Carpenter Lili from Inky Impressions.


I have used a 'Just for you' sentiment from Inky Impressions.


Don't forget to pop over to Inky impressions & check the new challenge & what the rest of the team have created HERE


This card will be entered into the following challenges:


All the best
Kerry 


Sunday, January 6, 2013

Mini easel double exploding box Tutorial

Hello, I have been asked to make a tutorial for a Mini easel double exploding box so here it is. 
This would have to be one of my most favourite crafts to make, you can put so much into one of these boxes.


What you need

3x  cardstock
Double sided tape or glue


First box

 Step 1. 30cm x 30cm card, ruled into nine 10cm squares (as shown above).
Step 2. Cut out the squares in each corner (so it looks like picture below).
Step.3 Fold to make a box.


Second Box

Step 1. 27cm x 27cm card ruled into nine 9cm x 9cm squares (as shown above).
Step 2. Cut out the four corners (like picture below).
Step 3. fold (see below).


Step 4. Stick the smaller box into the larger box (see below). 


Lid


Step 1. 16.2cm x 16.2cm card, measure in from all sides 3cm this should give you a square in the centre which measures 10.2cm (see above).
Step 2. See picture above & below on where & how to cut, only come in 3cm for each cut.


Step 3. fold & stick sides together (see below). 


Step 4. Place lid on to your box (see below).
 Well done you have now made a exploding box. 


Mini Easel card

 Step 1. 10cm x 20cm card, measure along the longest side 10cm & 5cm (see above)
 Step 2. Fold (see above & below)
 Step 3. Cut out a square 10cm x 10cm (see below on where it goes).
Step 4. You will need a piece of card 8cm x 5cm mounted on foam dots to place on card (see below) so the back will stand up.


Step 5. Stick card on top of your box (see below)


Well done you have now made a Mini easel double exploding box.

Now time to decorate the box, the fun part.


All the best 
Kerry